
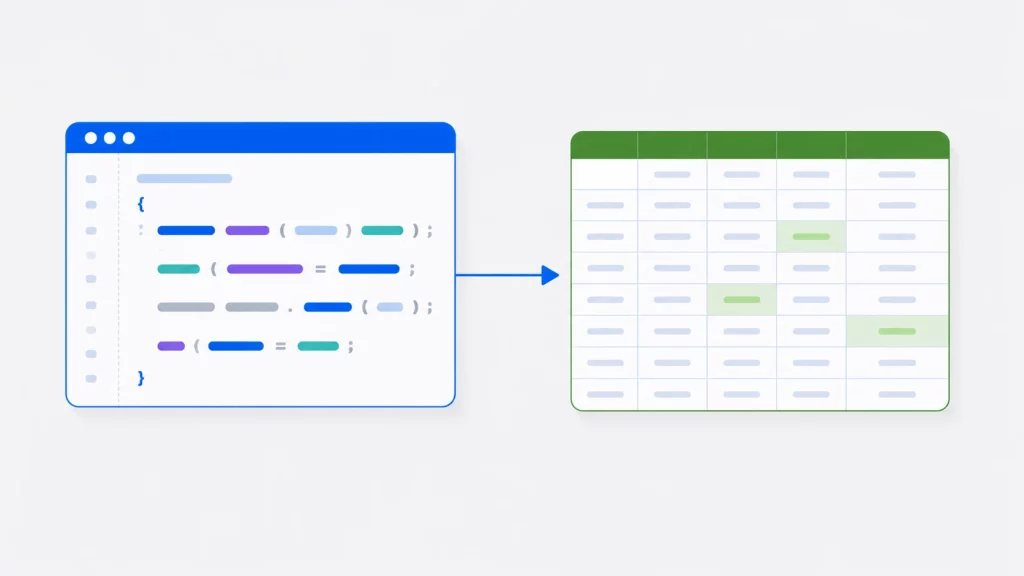
Reading and writing Excel files is one of the most common real-world tasks in C# — generating reports, importing spreadsheets, exporting data. There are several ways to do it, and the right choice depends heavily on whether your code runs on a server, in a container, or only on a Windows desktop with Excel installed.
This guide covers all the main approaches: the modern libraries ClosedXML, EPPlus, and NPOI that work in .NET Core and .NET 5–9, and the older Excel Interop method for legacy desktop scenarios. We’ll compare them, show working code for reading and writing with each, and help you pick the right one for your project.
Which C# Excel Library Should You Use?
| Library | License | .NET Core / 5–9 | Excel required? | Best for |
|---|---|---|---|---|
| ClosedXML | MIT (free) | ✅ Yes | ❌ No | Most projects — easiest API for .xlsx |
| EPPlus | Polyform Noncommercial (paid for commercial use since v5) | ✅ Yes | ❌ No | Advanced formatting, charts, pivot tables |
| NPOI | Apache 2.0 (free) | ✅ Yes | ❌ No | Free option; also reads legacy .xls |
| Excel Interop | Requires Office license | ❌ No | ✅ Yes | Automating desktop Excel on Windows only |
Short version: for most modern .NET Development, use ClosedXML — it’s free, cross-platform, and has the cleanest API. Choose NPOI if you also need to handle old .xls files or want an Apache-licensed option. Choose EPPlus for advanced formatting if you can accept its commercial license. Only use Excel Interop if you’re automating the actual Excel application on a Windows desktop.
Reading and Writing Excel with ClosedXML (Recommended)
ClosedXML is the most popular free library for .xlsx files. Install it from NuGet:
dotnet add package ClosedXMLWriting an Excel file:
using ClosedXML.Excel;

using var workbook = new XLWorkbook();
var sheet = workbook.Worksheets.Add("Employees");

// Header row
sheet.Cell("A1").Value = "Name";
sheet.Cell("B1").Value = "Salary";
sheet.Row(1).Style.Font.Bold = true;

// Data rows
sheet.Cell("A2").Value = "Alice";
sheet.Cell("B2").Value = 75000;
sheet.Cell("A3").Value = "Bob";
sheet.Cell("B3").Value = 68000;

workbook.SaveAs("employees.xlsx");
Reading an Excel file:
using ClosedXML.Excel;

using var workbook = new XLWorkbook("employees.xlsx");
var sheet = workbook.Worksheet(1);          // sheets are 1-based

foreach (var row in sheet.RowsUsed())
{
    string name = row.Cell(1).GetString();
    double salary = row.Cell(2).GetValue<double>();
    Console.WriteLine($"{name}: {salary}");
}
The one trade-off: ClosedXML loads the whole workbook into memory, so for very large files (hundreds of thousands of rows) a streaming reader like NPOI is more memory-efficient.
Reading and Writing Excel with EPPlus
EPPlus is powerful for advanced formatting, charts, and pivot tables. Note the license: since version 5, EPPlus uses the Polyform Noncommercial license — it’s free for personal and non-commercial use, but commercial use requires a paid license. Install from NuGet:
dotnet add package EPPlusWriting:
using OfficeOpenXml;

// Required once at startup since EPPlus 5 (set your license context)
ExcelPackage.LicenseContext = LicenseContext.NonCommercial;

using var package = new ExcelPackage();
var sheet = package.Workbook.Worksheets.Add("Report");

sheet.Cells["A1"].Value = "Product";
sheet.Cells["B1"].Value = "Units";
sheet.Cells["A1:B1"].Style.Font.Bold = true;

sheet.Cells["A2"].Value = "Widget";
sheet.Cells["B2"].Value = 1200;

package.SaveAs(new FileInfo("report.xlsx"));
Reading:
using OfficeOpenXml;

ExcelPackage.LicenseContext = LicenseContext.NonCommercial;

using var package = new ExcelPackage(new FileInfo("report.xlsx"));
var sheet = package.Workbook.Worksheets[0];   // EPPlus is 0-based

int rows = sheet.Dimension.Rows;
for (int row = 2; row <= rows; row++)
{
    string product = sheet.Cells[row, 1].Text;
    string units = sheet.Cells[row, 2].Text;
    Console.WriteLine($"{product}: {units}");
}
Note the indexing difference from ClosedXML: EPPlus worksheet collections are 0-based, while cell rows/columns are 1-based.
Reading and Writing Excel with NPOI
NPOI is a free (Apache 2.0) port of Java’s Apache POI. It’s the go-to when you need to read legacy .xls files as well as .xlsx, or want a fully free option with no licensing restrictions. Install from NuGet:
dotnet add package NPOIWriting:
using NPOI.XSSF.UserModel;   // XSSF = .xlsx ; HSSF = legacy .xls
using NPOI.SS.UserModel;

IWorkbook workbook = new XSSFWorkbook();
ISheet sheet = workbook.CreateSheet("Data");

IRow header = sheet.CreateRow(0);
header.CreateCell(0).SetCellValue("City");
header.CreateCell(1).SetCellValue("Population");

IRow data = sheet.CreateRow(1);
data.CreateCell(0).SetCellValue("Tokyo");
data.CreateCell(1).SetCellValue(37400068);

using var stream = new FileStream("cities.xlsx", FileMode.Create, FileAccess.Write);
workbook.Write(stream);
Reading:
using NPOI.XSSF.UserModel;
using NPOI.SS.UserModel;

using var stream = new FileStream("cities.xlsx", FileMode.Open, FileAccess.Read);
IWorkbook workbook = new XSSFWorkbook(stream);
ISheet sheet = workbook.GetSheetAt(0);

for (int i = 1; i <= sheet.LastRowNum; i++)
{
    IRow row = sheet.GetRow(i);
    string city = row.GetCell(0).ToString();
    string population = row.GetCell(1).ToString();
    Console.WriteLine($"{city}: {population}");
}
The Legacy Approach: Excel Interop
Excel Interop (Microsoft.Office.Interop.Excel) automates a real instance of the Excel application through COM. It was the standard approach for years, but it has serious limitations that make it a poor choice for most modern projects:
- It requires Microsoft Excel to be installed on the machine running the code.
- It only works on Windows — no Linux, no macOS, no containers.
- It is not supported in .NET Core or .NET 5–9 for server scenarios, and is officially discouraged for server-side use.
- It’s slow, and leaked COM objects can leave orphaned
EXCEL.EXEprocesses running.
Use it only when you genuinely need to automate the Excel desktop application itself (for example, driving Excel’s UI on a user’s Windows machine). For reading and writing files, prefer one of the libraries above.
// Set cursor as hourglass
Cursor.Current = Cursors.WaitCursor;
Excel.Application  xlApp = new Excel.Application();
Excel.Workbook xlWorkbook = xlApp.Workbooks.Open(FileName);
Excel._Worksheet xlWorksheet = xlWorkbook.Sheets[1];
Excel.Range xlRange = xlWorksheet.UsedRange;

xlWorksheet.Cells[1, 1] = txtWrite.Text;
xlApp.Visible = false;
xlApp.UserControl = false;
xlWorkbook.Save();

//cleanup
GC.Collect();
GC.WaitForPendingFinalizers();

//release com objects to fully kill excel process from running in the background
Marshal.ReleaseComObject(xlRange);
Marshal.ReleaseComObject(xlWorksheet);

//close and release
xlWorkbook.Close();
Marshal.ReleaseComObject(xlWorkbook);

//quit and release
xlApp.Quit();
Marshal.ReleaseComObject(xlApp);

// Set cursor as default arrow
Cursor.Current = Cursors.Default;
Read data from Excel file
The following C# code also uses the same mechanism to read the data from an Excel sheet. First, it creates a new Excel instance, open a specified workbook and read value from the second cell of the worksheet. It also includes cleanup code to release resources and ensure that the Excel process is fully closed.
// Set cursor as hourglass
Cursor.Current = Cursors.WaitCursor;

Excel.Application xlApp = new Excel.Application();
Excel.Workbook xlWorkbook = xlApp.Workbooks.Open(FileName);
Excel._Worksheet xlWorksheet = xlWorkbook.Sheets[1];
Excel.Range xlRange = xlWorksheet.UsedRange;

if (xlRange.Cells[1, 2] != null && xlRange.Cells[1, 2].Value2 != null)
{
    txtRead.Text = xlRange.Cells[1, 2].Value2.ToString();
}

//cleanup
GC.Collect();
GC.WaitForPendingFinalizers();

//release com objects to fully kill excel process from running in the background
Marshal.ReleaseComObject(xlRange);
Marshal.ReleaseComObject(xlWorksheet);

//close and release
xlWorkbook.Close();
Marshal.ReleaseComObject(xlWorkbook);

//quit and release
xlApp.Quit();
Marshal.ReleaseComObject(xlApp);

// Set cursor as default arrow
Cursor.Current = Cursors.Default;
If you do use Interop, releasing COM objects correctly is essential to avoid orphaned Excel processes. The cleanup pattern below — collecting garbage and calling Marshal.ReleaseComObject on every COM reference — is what most beginners miss.
Handling Common Errors
A few exceptions come up repeatedly when working with Excel files in C#:
FileNotFoundException— the path is wrong or relative to the wrong working directory. Use an absolute path or verifyDirectory.GetCurrentDirectory().IOException(“file is being used by another process”) — the file is open in Excel, or a previous run didn’t release it. Close the file and ensure you dispose workbooks (usingblocks handle this).NullReferenceExceptionwhen reading a cell — the cell is empty. Always check for null/empty before calling.GetString()or.Value.- EPPlus
LicenseException— you didn’t setExcelPackage.LicenseContextbefore using the package (required since v5).
Wrap file operations in try/catch and always use using declarations so workbooks and streams are disposed even when an exception is thrown.
Steps to read and write data from Excel using C# – Interop
In this tutorial, we are going to use Microsoft Visual Studio 2017 Community Edition.
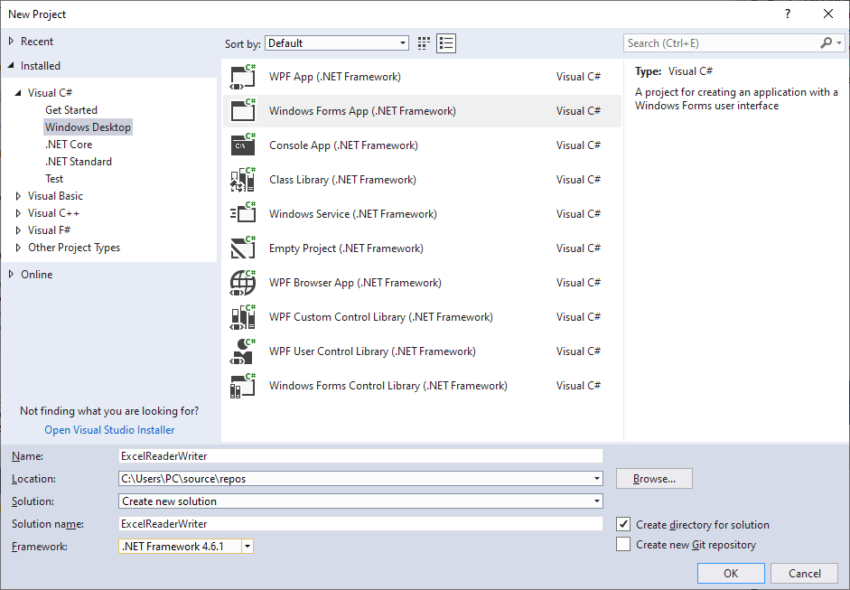
Step 1: Create a new C# project in Visual Studio
Open up Visual Studio and create a new Windows Desktop application using Visual C#. You can choose any .NET Framework available in your computer. We are going to use .NET Framework 4.6.1.
Step 2: Add COM Component Reference i.e. Excel 14 Object
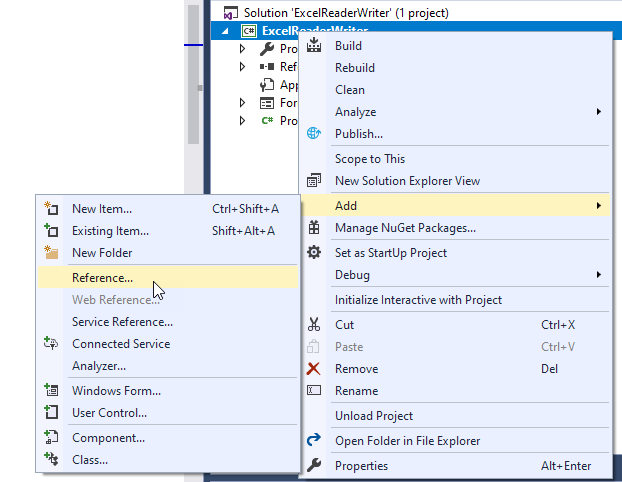
Next step is to right click on ExcelReaderWriter C# Project under Solution Explorer and choose Add->Reference.
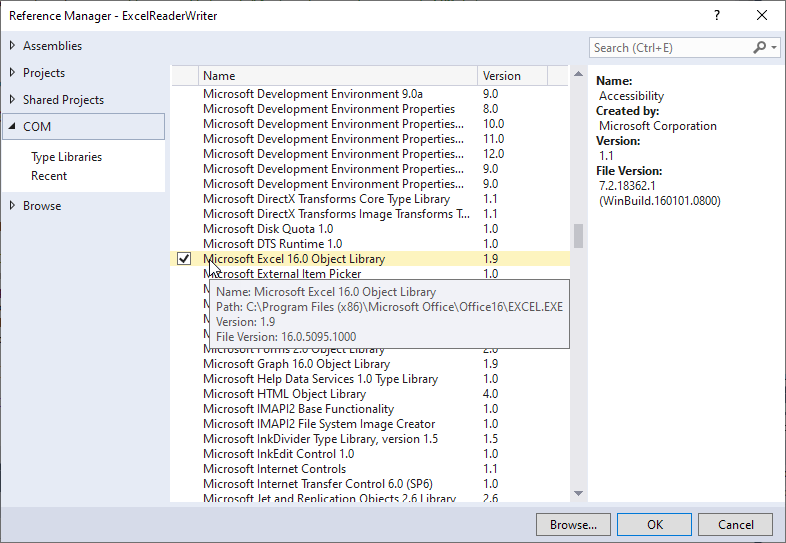
Then choose COM->Type Libraries and select the desired COM Component for Excel. In our case we used Microsoft Excel 16.0 Object Library.
Step 3: Import the namespaces in C# code
Add the following namespaces to import into the code.
using System.Runtime.InteropServices;

//Microsoft Excel 16 object in references-> COM tab
using Excel = Microsoft.Office.Interop.Excel;
Also create a class variable to hold Excel File name i.e.
private string FileName = @"C:\data.xlsx"Step 4: Write Data to Excel File
Add a Button and TextBox controls on the form. Then double click on the button to show up the code view and Visual Studio Automatically creates the button click event handler. Add the code to the handler so that it looks like below:
private void btnWrite_Click(object sender, EventArgs e)
{
    // Set cursor as hourglass
    Cursor.Current = Cursors.WaitCursor;
    Excel.Application  xlApp = new Excel.Application();
    Excel.Workbook xlWorkbook = xlApp.Workbooks.Open(FileName);
    Excel._Worksheet xlWorksheet = xlWorkbook.Sheets[1];
    Excel.Range xlRange = xlWorksheet.UsedRange;

    xlWorksheet.Cells[1, 1] = txtWrite.Text;
    xlApp.Visible = false;
    xlApp.UserControl = false;
    xlWorkbook.Save();

    //cleanup
    GC.Collect();
    GC.WaitForPendingFinalizers();

    //release com objects to fully kill excel process from running in the background
    Marshal.ReleaseComObject(xlRange);
    Marshal.ReleaseComObject(xlWorksheet);

    //close and release
    xlWorkbook.Close();
    Marshal.ReleaseComObject(xlWorkbook);

    //quit and release
    xlApp.Quit();
    Marshal.ReleaseComObject(xlApp);

    // Set cursor as default arrow
    Cursor.Current = Cursors.Default;

}
Step 5: Read Data from Excel File
Create another Button and TextBox control to use for reading the data from Excel file. Add the following code to button click even handler.
private void btnRead_Click(object sender, EventArgs e)
{
    // Set cursor as hourglass
    Cursor.Current = Cursors.WaitCursor;

    Excel.Application xlApp = new Excel.Application();
    Excel.Workbook xlWorkbook = xlApp.Workbooks.Open(FileName);
    Excel._Worksheet xlWorksheet = xlWorkbook.Sheets[1];
    Excel.Range xlRange = xlWorksheet.UsedRange;

    if (xlRange.Cells[1, 2] != null && xlRange.Cells[1, 2].Value2 != null)
    {
        txtRead.Text = xlRange.Cells[1, 2].Value2.ToString();
    }

    //cleanup
    GC.Collect();
    GC.WaitForPendingFinalizers();

    //release com objects to fully kill excel process from running in the background
    Marshal.ReleaseComObject(xlRange);
    Marshal.ReleaseComObject(xlWorksheet);

    //close and release
    xlWorkbook.Close();
    Marshal.ReleaseComObject(xlWorkbook);

    //quit and release
    xlApp.Quit();
    Marshal.ReleaseComObject(xlApp);

    // Set cursor as default arrow
    Cursor.Current = Cursors.Default;

}
Step 6: Run the C# Program
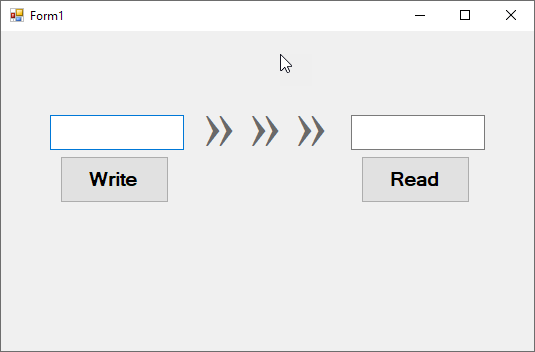
Compile and run the program now. The output should be similar to the one showing below. Enter some data in first text box and click Write button. It will write data to already created Excel file C:\data.xlsx. Similarly, you can click on Read button, which will read the data from same Excel file and show it in the second text file.
There are other third party libraries available, which you can use in your code to read and write Excel files. These libraries are available both under open source as well as commercially available. Few of them are:
- https://github.com/nissl-lab/npoi – Open Source, Apache 2.0 License
- https://github.com/EPPlusSoftware/EPPlus – Commercially Available
- https://github.com/JanKallman/EPPlus – Available under LGPL
- https://bytescout.com/products/developer/spreadsheetsdk/bytescoutspreadsheetsdk.html – Commercially Available